Tool room and tool crib organisation with trays, bins and louvre panels
A tool room is judged by how long it takes to find the right tool and how quickly a missing one is noticed. How to zone the space, choose trays and drawer containers, and run issue control that people will follow.
The search that costs more than the tool
Walk into almost any tool room at the start of a shift and you can watch a particular kind of waste happening. A fitter needs a 13 mm ring spanner. He asks the crib attendant, who looks in the drawer where spanners are meant to live, finds an 11 and a 14, searches two other drawers and a trolley, and eventually hands over a spanner that may or may not be the one the job needs. The whole exchange has taken six minutes. The spanner costs a few hundred rupees. The fitter's time, the attendant's time and the delay to the job have cost many times that, and the same scene repeats thirty times a shift.
Tool rooms get disorganised for reasons that are entirely human. Tools are returned in a hurry. Sets get split when one piece is borrowed. A drawer fills up with whatever fits, and after a year nobody remembers the logic behind the arrangement. Because every individual tool is cheap and every individual search is short, nobody ever totals the cost, and the tool room carries on being a place where things are probably somewhere nearby.
The remedy is not a heroic reorganisation that lasts a fortnight. It is a layout that makes the right place for each tool obvious, makes a missing tool visible within seconds, and makes issuing and returning so simple that people do it correctly without being reminded. This article sets out how to design that layout using the kind of equipment ALKON makes: tool trays, drawer containers, louvre panels and rails, bins and modular drawer systems. It also covers the issue-control side, since the best layout in the world fails if tools leave the room without a record.
What a tool room is actually for
The first job is to be clear about the purpose. A tool room, or a tool crib in a smaller plant, exists to make sure the right tool is available, in usable condition, at the moment a job needs it, and to know where every tool is at all times. Those two outcomes, availability and traceability, sound similar but pull in slightly different directions. Availability argues for open access and quick service. Traceability argues for control and records. A good tool room balances them for each category of tool instead of choosing one rule for the whole building.
A useful way to think about it is to separate tools by value and by how often they are used. Everyday hand tools such as screwdrivers, pliers, spanners and files are cheap, used constantly and lost at a steady rate. Measuring instruments such as vernier callipers, micrometres and dial gauges are expensive, delicate and need calibration records. Cutting tools such as drills, taps, reamers and inserts are consumed and need stock control. Power tools and special fixtures are costly and need maintenance schedules. Each group deserves its own zone and its own control level, and the physical layout should make the boundaries obvious.
Start by counting and sorting what you have
Before buying anything, take an inventory. Pull every tool out of every drawer onto benches and sort it. The exercise is unpleasant and invaluable, because it tells you how many of each type exist, which are damaged, which are duplicates, which belong to someone else's department and which have not been used in two years. Most tool rooms discover that a fifth to a third of what they hold is surplus, broken or unidentifiable. That material should go to a quarantine shelf, be tagged and be resolved within a fixed period, either returned to service, repaired, sold or scrapped.
While sorting, record three facts for every tool type: how many you hold, how often it is issued and its approximate value. Even rough figures are useful. A simple tally on a sheet of paper over two weeks, noting each issue, will reveal that a short list of tools accounts for most of the traffic. Those tools should live in the most accessible positions, and the rarely used ones can move to the back. The same classification logic that drives a stores cycle count applies to tools: spend your attention where the traffic and the value are.
Zoning the room
With the inventory done, divide the room into zones that match how tools are used. A layout that works for many plants has four.
Plan the flow so that a person returning a tool does not cross the path of someone being issued one, and so that the attendant can see the whole room from the counter. A small room can combine zones, but it should still keep the logical separation, because mixing precision instruments with hand tools is one of the commonest ways delicate equipment gets damaged.
- A front counter or hatch where issues and returns happen, with the most frequently issued tools within arm's reach of the attendant and a clear surface for inspecting returns.
- A hand-tool zone, laid out so that each tool type has its own place, with the common ones at working height and the rest above and below.
- A measuring and precision zone, kept apart from the dust and vibration of the issue counter, with controlled access, protective trays and a calibration register.
- A consumables and cutting-tool zone, laid out like a small stores, with bins, labels and stock levels.
Shadow boards, and why they work
The most powerful device in a hand-tool zone is the shadow board: a panel with an outline of each tool marked where it hangs, so that an absent tool leaves a visible gap. It turns a mental task, remembering what should be here, into a visual one. A returned tool goes to its outline. A tool that is out leaves a hole that anyone can see from across the room.
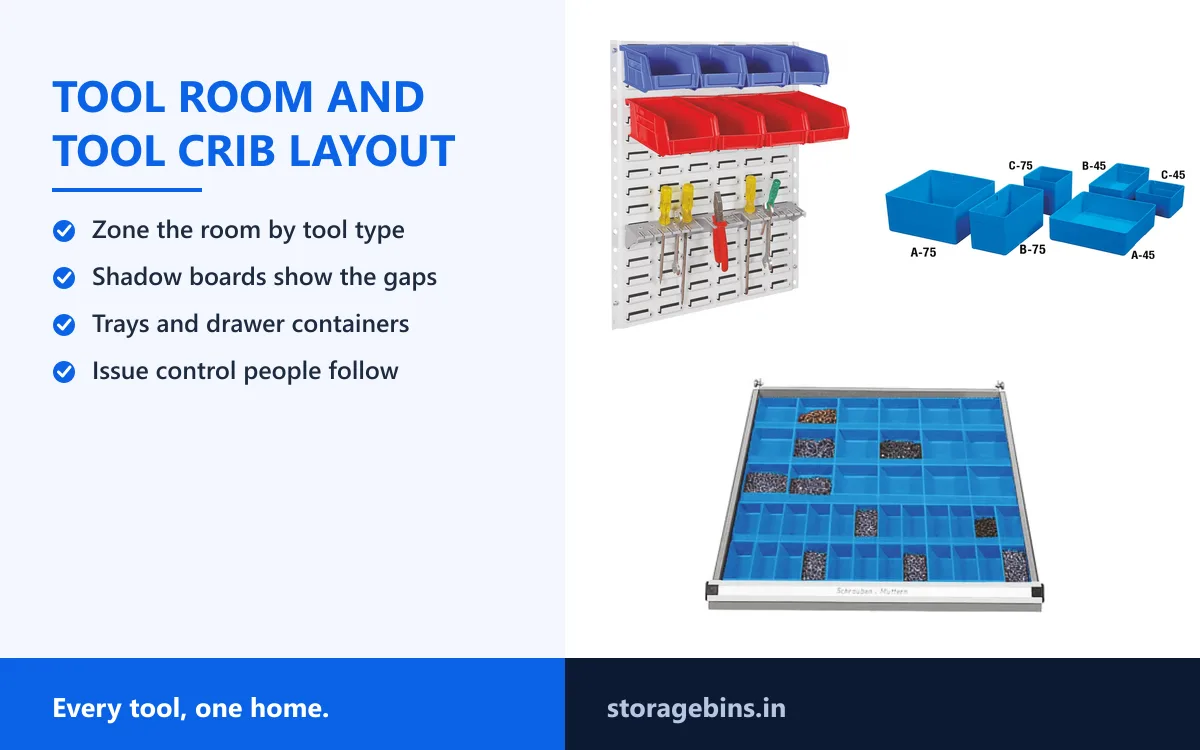
Shadow boards can be made on pegboard, on louvre panels or on plain steel panels. ALKON louvre panels and rails are made from 1.5 mm CRCA steel and powder coated in light grey RAL 7035, and they hold a wide range of bins and accessories, including the multi-purpose tool tray, which is made from high impact polystyrene and designed to hold screwdrivers, files, pliers and spanners. The tray can be screwed to a wall or workstation, or hung on a louvre panel, so a mixed board of outlines for large tools and trays for smaller ones is easy to build and easy to change. Because the panels are modular, a board can be extended as the tool holding grows or rearranged when a new job brings in a different set.
Two conventions improve a shadow board. First, mark the outline in a contrasting colour so that the gap is unmistakable. Second, label each position with the tool name and size, so that a replacement or a newcomer does not have to guess. Where several tools of a kind hang side by side, such as a set of spanners, order them by size so that a missing one is obvious from the break in the sequence.
Trays for tools that need a pocket
Not every tool hangs well. Small items such as punches, scribers, taps and drill bits are better kept in trays with defined compartments, and bits and pieces such as spare screws and clips are best kept in bins. The tool tray fills this role in many installations. It is a plain, open, low-profile tray that holds a group of related tools together, so a fitter taking a kit for a job takes the whole tray instead of hunting for the individual items.
Think of trays as the unit of issue for common job types. A tray for a bearing replacement might hold a puller, a set of feeler gauges, a few spanners and a hammer, and be signed out as one item. This speeds up issue, makes returns easier to check and reduces the chance that a single tool disappears into someone's toolbox, because the tray is visibly incomplete when it comes back. It also gives the attendant a natural way to reconcile: count the pieces against the tray's own list.
Colour can help here too. A different tray colour for each maintenance team or each machine area lets an attendant see at a glance which tray belongs where. As with any colour scheme, keep the number of meanings small and publish them on the wall.
Drawer containers for cabinets
Many tool rooms rely on cabinets and rolling tool chests, which are efficient for density but treacherous for order. A drawer holding fifty loose items is a puzzle, and each time a person rummages through it, the arrangement degrades.
ALKON drawer containers are designed precisely for this. They are made from high impact polystyrene, sized to fit standard tool cabinet drawers, and come in six sizes in two heights. The catalogue lists three footprints, 150 x 150, 150 x 75 and 75 x 75 mm, each in 45 mm and 75 mm heights, all in blue, with a label holder on each container. They sit side by side in a drawer, creating clearly defined compartments for each type of hardware or standard part. Because they are modular, a drawer can be reconfigured when the contents change without buying a new cabinet.
The method is simple. Measure the drawer, plan the grid of containers that fills it with minimal gaps, and assign one tool or part type to each container. Label each container, and tape a small plan of the drawer inside the cabinet door or on the drawer front so that anyone can see where things go. A drawer designed this way is faster to use, easier to count and much easier to restore after a rummage, because every item has a defined home.
Where the cabinet holds consumable hardware, such as nuts, bolts, washers, split pins and circlips, the containers can double as stock bins. A reorder level can be marked on the container's label, and when the level is reached the attendant puts in a request. A simple rule, such as always keeping two containers of every fast-moving size, gives a primitive two-bin system inside a drawer.
Bins for consumables and small parts
The consumables zone is the part of a tool room that most resembles a store, and it benefits from the same bin discipline. Drill bits, taps, abrasive discs, inserts, grinding wheels, safety items and spare handles all need defined homes and minimum levels.
For small consumables, open-front bins on louvre panels or on rails are ideal, because the face of each part is visible, a bin can be taken to the bench and returned, and the panel can be reconfigured. The Supra range, in sizes from the small SB 1, with outside dimensions of 125 x 100 x 60 mm, to the larger SB 8, at 600 x 425 x 300 mm, covers most sizes used in a tool room. Bins mount on louvre panels with their rear lip, stack when stored and carry identification card holders. For longer or taller items, a Bull bin or a Hippo bin may suit better, and partitions let a single bin hold several sizes of the same family without mixing them.
Poly bins and rails, the catalogued PBR-205 set of twenty light grey bins and five rails for wall mounting, offer a compact way to organise very small hardware at a workbench. Each poly bin measures 125 x 100 x 75 mm, and the rails let the set be mounted on a wall or panel at a convenient height. It is the sort of kit that a single workstation can install in an afternoon, and it suits small teams that want order without a big project.
Measuring instruments need a different kind of care
Precision instruments deserve their own rules because their failure modes are different. A micrometre dropped on a concrete floor may look unharmed and be out of tolerance. A set of gauge blocks left uncovered will corrode. A calliper that has not been calibrated is a source of wrong measurements, and wrong measurements are expensive in ways that a missing spanner is not.
Give instruments individual storage, such as a fitted tray or a padded drawer, where each item has its own shaped place. Keep them in a controlled area, away from the issue counter and from heat and dust. Maintain a register with the instrument number, its calibration due date and its issue history. Label each instrument with its number and due date so that a user can see at a glance whether it is in date. An instrument past its due date should be segregated, not left in the drawer, because the point of a calibration system is that out-of-date instruments cannot be used by mistake.
Fixing a rule for who can draw instruments, and recording each issue, is justified by their value and their effect on quality. It is also a good place to introduce a simple sign-out system, since the user community is smaller and the benefit is clearer.
Issue control that people will actually follow
A beautiful layout does nothing if tools leave without a trace. Issue control does not have to be heavy, but it has to be simple enough that it is done every time. Three patterns work in practice.
Pick the lightest method that provides the control a given category needs, and be consistent. A good rule is that nothing leaves the tool room without either a token on the board or an entry in the register. Whatever the method, make the attendant the only person who handles the records, and give the attendant the authority to refuse an issue that does not follow the rule.
- The ticket or token system. Each user has a numbered brass token or card. When a tool is issued, the token hangs in the tool's place on the board. A tool's absence and the identity of its holder are visible at once, with no paperwork. The system is cheap, instantly understandable and works well for hand tools and small sets.
- The register. A logbook, or a spreadsheet kept at the counter, records the date, the tool, the user and the time out and in. It is slower than tokens but provides a record, which is useful for expensive or calibrated items.
- The tray or kit sign-out. As described above, the attendant issues a complete tray against one signature and checks the tray on return. This reduces the number of transactions and makes completeness checking quicker.
The return is where order is won or lost
Most disorder in a tool room is created at the return, not the issue. A tool is handed back in a hurry, dropped into the nearest drawer and forgotten. To prevent this, make the return procedure as easy as the issue.
Return tools to the counter, not directly to the shelves, and let the attendant inspect and put them back. This gives a chance to spot damage, clean the tool and replace it in the right outline or tray. It also makes it impossible for a returned tool to end up in the wrong place. The attendant can combine the check with a short count of the tray, glance at the shadow board and clear the token. When tools are returned at a shift change, a queue builds, so make sure the counter is staffed at those times or provide a drop box that is emptied at once and checked.
Damaged tools need a route. A red tray or a marked box at the counter, labelled for repair or scrap, stops a faulty tool from going back onto the shelf and being issued again. The attendant reviews the box daily, and a tool in it has a short, defined route out.
Consumable control and reorder points
Cutting tools and other consumables need stock control as well as organisation. A modest system works well. Give each consumable a location, a minimum level and a reorder quantity. Mark the minimum on the bin or its label. When the stock reaches the minimum, the attendant raises a request. For fast-moving items a two-bin setup is easy to run: two bins of the same item, with the second opened only when the first is empty, and the empty one acting as the reorder signal.
Count the consumables on a cycle, not once a year. A tool room that counts a few locations a day finds problems while they are traceable, and the habit is explained in more detail in our article on cycle counting with storage bins. Items with high value, such as carbide inserts and specialty taps, should be counted more often than low-value items such as emery paper.
Track consumption by machine or department where you can. If one department uses twice the drill bits of a comparable one, there is a story to find, whether a worn machine, a bad batch or a technique problem. The tool room is in a unique position to see this, and the data is cheap to collect when the issue records are already there.
Ergonomics, lighting and the physical room
The room itself affects how well the system works. Heavy items belong at waist height or on the floor level, not overhead. Frequently used tools should sit between knee and shoulder height, in what ergonomists call the primary reach zone, and rarely used ones can go higher or lower. Aisles should be wide enough for two people to pass and for a trolley to turn. Lighting should be good, with no shadowed corners, because a dim shelf is a place where things get lost.
Floors should be clean and non-slip, particularly near the counter where oil can arrive on tools. Bins and trays made of polypropylene or polystyrene are easy to wipe down, do not rust and will not damage the tools. That is a practical advantage over some alternatives, and it is described in more detail in our comparison of plastic and metal bins.
Provide a clear bench or a lit table at the counter for inspecting returns, and keep a small stock of cleaning materials and tags there. The inspection step is more likely to happen if the equipment for it is within reach.
Mobile solutions: trolleys and kits
Some jobs need the tools to go to the work rather than the work to the tools. Maintenance teams, assembly lines and field service crews all benefit from mobile kits. A trolley carrying louvre panels with bins and trays, such as the ALKON shop floor trolley or Tuff trolley systems, lets a fitter take the likely requirements of a job in one trip. The trolley is a mobile mini tool crib: it has its own layout, its own shadow outlines and its own issue record.
Treat a trolley as a location in its own right. Give it a number, list its standard contents and check it on return against that list. A trolley that goes out complete and comes back complete is a trolley that works. One that is allowed to drift will lose its tools within a month, and the fix is to restock and recheck it at a fixed interval, for example every Friday.
For jobs that recur, pre-pack the kit in a tray. A shutdown team that needs the same twenty tools for every bearing change gets a faster start when the tray is ready, and the attendant can restock it at leisure rather than under pressure.
Cleanliness, 5S and keeping it that way
A tool room is one of the best places to apply 5S, the discipline of sorting, setting in order, shining, standardising and sustaining. The principles map directly. Sort removes the surplus and broken tools. Set in order gives each tool its place. Shine means cleaning each tool as it is returned. Standardise means that every zone follows the same rules and labels. Sustain means that audits are regular and the system is protected from drift.
The audit is the part that most often lapses. A short weekly check against a one-page list, looking at the shadow boards, the trays, the drawer plans and the issue records, keeps the system honest. Rotate the auditor so that fresh eyes are applied, and publish the results. The principle is the same as in the more general guidance on 5S storage bins: visual order makes problems obvious, and obvious problems get fixed.
Make sure the room's standards are written, short and accessible. A sheet taped inside the door that tells a new attendant how to issue, how to receive a return, how to handle damaged tools and when to count, is far more effective than a manual no one reads.
Planning the purchase
When the inventory is done and the zones are drawn, the shopping list is usually shorter than expected, because the main purchase is organisers, not tools. A typical tool room upgrade might include louvre panels and rails for the hand-tool and consumables zones, a quantity of Supra or Bull bins in two or three sizes for consumables, tool trays for kit-based work, drawer containers for existing cabinets, a trolley or two for mobile work, and label holders and labels. Measuring instruments need their own fitted trays or drawers.
Plan in stages. Start with the busiest zone, set it up properly, run it for a month and use the experience to improve the next one. Choose a limited number of bin sizes and stick to them, so that stock, labels and panels remain interchangeable. The dimensions of every ALKON bin are published in the product catalogue, so the layout can be planned on paper before anything is bought.
Think about growth. A tool room that is filled to capacity on the day it opens has no room for a new line of tools. Leave twenty per cent of panel space and a few empty bins in reserve. It is far easier to fill a prepared space than to squeeze something into a full one.
A worked example: a small maintenance crib
To make this concrete, picture a maintenance crib of about twelve square metres serving a mid-sized engineering plant. Before the project it has two steel almirahs, a rolling chest and a table. Spanners live in a drawer in no particular order, drill bits are in a biscuit tin, and the attendant keeps a notebook that he updates when he remembers.
The inventory takes two days and finds roughly a quarter of the contents are duplicates, damaged or belong to other departments. Those go to quarantine. The issue tally shows that about thirty tool types account for most of the traffic, mostly spanners, screwdrivers, pliers, hammers, files and a few measuring tapes.
The new layout puts a counter hatch at the doorway with the thirty busiest tools on a louvre panel directly behind the attendant, each with an outlined position and a token hook. A second panel holds trays of kit sets for the four commonest jobs: bearing change, coupling alignment, belt replacement and pump seal change. The rolling chest is rebuilt with drawer containers, so each size of hardware has its own labelled compartment. Drill bits, taps and abrasive discs move into small open-front bins on a third panel, each with a minimum level written on its label. The three vernier callipers and two micrometres go into a separate fitted drawer with a calibration register on the lid.
The attendant now issues against tokens, checks trays on return and counts four locations a day. Within a month the notebook is retired, the searches have shortened to seconds and the first monthly review shows that three popular spanner sizes were chronically short, an easy fix. The investment was modest, a few panels, some bins and trays and a few weeks of effort, and the gain was an attendant with time to manage the room instead of searching it.
Training the people, not just fitting the room
A tool room is a social system as much as a physical one. The attendant needs to know the rules and be backed by the supervisor in enforcing them, and users need to understand why the rules exist. A twenty-minute briefing when the new layout opens, covering where things are, how tokens work and why returns go to the counter, saves months of friction.
Involve the users early. Ask the fitters which tools they use most and what slows them down. They will usually be the first to tell you that a particular spanner is always missing or that the micrometre drawer is too far from the counter. A layout that reflects their experience is accepted much more readily than one imposed from above, and the improvements they suggest are often cheap.
Finally, name an owner. A tool room with a clear owner who is responsible for its standards, its records and its audits keeps its order. One without an owner slides back to the tin of drill bits within a year.
What good looks like
A well-run tool room has a few signs that anyone can check in a minute. A new person can find a given tool in under half a minute without asking. A missing tool is visible from the counter. Every returned tool is back in its place by the end of the shift. The records of calibrated instruments are up to date. The attendant knows which consumables are close to their minimum. Nothing is on the floor, and nothing is in a drawer without a label.
If these are true, the room pays for itself in time saved, and the benefits spread outwards. Maintenance fitters start jobs faster, production lines lose less time to tool searches, calibration problems are caught before they reach customers, and the plant spends less replacing tools that have simply gone astray.
Where to begin
Start small. Pick one drawer, one panel and one category of tool. Sort, label and set it in order, and run it for two weeks. Use what you learn to refine the method, and then extend it. A tool room is rebuilt one cabinet at a time, and the early wins are what make the next stage easy to approve.
If you would like help choosing trays, drawer containers, louvre panels or bins for a tool room, Shreeram Metafusion Engineers can advise from Vashi, Navi Mumbai. As authorised stockist of ALKON Plastics Pvt. Ltd. for over thirty years, we supply from a catalogue of 476-plus products, and the full dimensions of each item are available on the product pages of this website.
Read next